Corned and Beefed

Corn is such an important staple in our diet because it and/or byproducts of it are used in many different products. We began our class by discussing the intricacies that surround corn and its production from the beginning. After this conversation, we started cooking steaks.  Using different cooking techniques for each steak, we ended the class by comparing and finally tasting all the different methods. We also had a couple steaks that were marinated in brine prior to the class as another form of comparison. The methods for cooking each steak that we used were pan seared, sous vide, microwaved, boiled, grilled, and braised.


IMG_1968

Top left is microwaved, top center is boiled, and top left is braised. The two on the bottom left are sous vide, the three center are grilled, and the two on the bottom right are pan-seared.

Fertilizer was the first topic we talked about, from its production to its role in the production of corn. The main fertilizer used on corn today is man-made ammonium nitrate (NH4NO3). This nitrogen rich compound is extremely useful because it provides corn with large amounts of nitrogen ready for uptake. The nitrate and ammonia compound can be readily absorbed by plant roots; microorganisms that sit at the roots of legumes convert nitrogen gas into nitrates while receiving sugar from the plant in a symbiotic relationship.

The industrial process of producing ammonia is interesting because it takes extremely stable nitrogen gas, and under massive amounts of pressure, heat, and catalyzers in the presence of hydrogen, ammonia can be made.

Fertilizer


From there, the basic ammonia readily reacts with nitric acid in a simple acid/base reaction to create the salt farmers know and love, ammonium nitrate. But beware, this compound is not very stable and has been known to cause explosions (intentional or otherwise)!!

We then went into a short discussion about how corn goes through the processes of photosynthesis. During photosynthesis, the corn absorbs CO2 present in the air, and produces oxygen and keeps the carbon through this process. Corn is known as a C4 plant because it utilizes nitrogen present in its environment to absorb carbon more effectively in the photosynthetic process (this is why nitrogen fertilizers are so important, particularly for corn).

Finally, we were onto the meat. Using three big pieces of steak (one brine marinated other two normal) cut into nine pieces total, they were separated into the different cooking methods (pan seared, sous vide, microwaved, boiled, grilled, and broiled). Two steaks, one brined and one un-brined, were pan-seared and also cooked under sous vide method, while two un-brined and one brined were grilled. Un-brined steak were used for the boiling, microwaving, and broiling methods.

I personally did the pan searing method using a cast iron skillet. With a little bit of oil and the high heat from the pan, both steaks began the Maillard reaction quickly. The outside of the steak quickly browned and strong aromas filled the air. The brined and un-brined didn’t have too many differences between them besides a slightly visible gray tint on the brine steak and slightly salty taste.

IMG_1946

Three steaks were grilled because we wanted to cut one steak open as soon as it taken off the grill, but let the other two cool down and finish cooking or resting. Un-brined steak was used for this process, and what occurred was surprising. The steak that was cut immediately lost most of its juices and was less cooked than the other two steaks. This caused the steak to be less flavorful and tougher than the other two. There was no real difference in the brine and normal grilled steak on flavor in my opinion, but because we waited to cut them, the fluids could sit in the steaks and really soak in the flavor we know and love (it also allowed for the heat to remain in the steak for a little longer to cook the meat more thoroughly).


img_1951.jpg

Sous vide was used for a brined and un-brined steak as well; using this method the steaks were cooked at 72 ºC in water. This ensures a medium rare cook, but because it is fully immersed in liquid, the steak should have the same doneness as the others, but without any Maillard browning. This happened almost exactly as planned, but the flavor and texture of the sous vide steak were chewy–well-cooked, but chewy. Also, the brine flavor was very noticeable in this steak because all the flavors and fluids stayed in the meats as they were cooked.

The boiled steak turned completely gray when submerged in water. It cooked completely through, but resulted in an unappealing color, texture, and taste. The microwaved steak also came out slightly gray; it was less fully cooked through, and had a decent flavor that surprisingly got better the longer it sat out. For both, the Maillard browning could not occur because the presence of water, and inability to reach high enough temperatures.

The last method was braising. Unfortunately, we set the oven to too high of a temperature, so the steak cooked fully through very quickly. Maillard did occur on the top which was not sitting in the broth, but the texture of the meat was extremely chewy and we managed to turn a nice steak into something not nearly as appealing.


img_1950.jpg

The braised steak had Maillard browning on the portion that was exposed to air in the oven, but the portion that was in the broth, while cooked, did not

If you want to read more about meat: https://www.exploratorium.edu/cooking/meat/meat-science.html

img_1962.jpg

References:

McGee, H., Dorfman, P., & Greene, J. (2004). On Food and Cooking. New York, NY: Scribner.

https://www.exploratorium.edu/cooking/meat/meat-science.html


Would you like some sugar with that?

Once arriving at the Farm, we got straight to work so that we could attend the festivities of the announcement of the next president of the Colleges. Congratulations Dr. Gregory Vincent!

Now on to the important stuff, foams! Foams are dispersions of gas in a liquid. Today’s class focused on meringues and whipped cream. Meringues were the first to be created, due to the fact that they were to be baked into quenelles, which takes about 40 minutes if the temperature of the oven is set correctly (and longer if it is not, as we found out).

The control experiment was created using the following ingredients

3 egg whites

¾ cups sugar

Dash of vanilla

The final mixture went from looking like this…

IMG_1534.jpg

To this!

IMG_1543.jpg

When forming the meringue into quenelles, half of the batter was used to make plain quenelles, and the other half had semi-sweet chocolate chips added to them.

IMG_1549.jpg

IMG_1554.jpg

Because we are people of science, the control did not satisfy our hunger for foam knowledge. Seven other experiments were conducted to discover more about the mysterious nature of foams.

Experiment 1: Adding sugar before beating the egg whites into a foam.

In this experiment, the meringue generated had noticeably less volume and appeared much more glossy.

Here they appear near the control. The control is behind the dividing line, and experiment 1 is in front of the line.

IMG_1575.jpg

Experiment 2: Using over beaten egg whites

When mixed, this meringue had much more volume than the control.

Experiment 3: Using brown sugar instead of white

The obvious difference between the brown sugar and the control was the color, however the brown sugar meringue was also heavier. The retained moisture of the brown sugar had a definite impact on the weight of the merengue.

IMG_1581.jpg

Experiment 4: Whipping the meringue by hand

This meringue did not quite come to fruition. The egg whites were beaten into a nice foam, but when the sugar was added whipping became much more difficult. While we had strong, capable whiskers make their best attempts, the result was a soupy meringue that was unable to be formed into a quenelle.

IMG_1584.jpg

Experiment 5: Adding lemon juice

Appearance was not much different, but had delightful lemon flavor.

IMG_1579.jpg

While the meringues baked and our mixing bowl and whisk were cooling in the refrigerator, the class took a few moments to talk about our upcoming presentations at the Edible Science Fair. Topics were solidified and ideas were shared and generated in order to best prepare to give an informative, engaging presentation.

Once prompted by the timer to remove the quenelles from the oven, the class returned to the kitchen. While the quenelles looked delicious, we waited for them to cool before indulging on them. During that time we did not remain idle however! The groups that were unable to place quenelles on trays were getting their meringues into the oven. We also removed the whisk, bowl and cream from the refrigerator. It is ESSENTIAL that the materials for a whipped cream be cold, so that the solid fat globules of the cream do not melt and become liquid. This would destroy the foam! The fat globules are denatured by whisking and interact with the air and surrounding fat to create a sturdy, voluminous whipped cream.

Now that we had whipped cream, lemon curd, and cooled quenelles, the eating began!

IMG_1586.jpg

When opening the control, it was easy to see that the meringue had cooked throughout. The inside of the crust was filled and full. It was interesting to see how heat could stabilize a meringue but destroy a whipped cream.

The control quenelles that contained chocolate chips were found to have air pockets inside of them. This is because the density of the chocolate chip crushed the meringue underneath of it. This was consistent of all the quenelles with chocolate chips.

The quenelles made from the meringue that had sugar added before mixing were found to have collapsed inside of their crusts. This was because the inside remained moist and dense and condensed during cooling. These had a crispy texture from the crust but were chewy on the inside.

The quenelles made using the over beaten egg whites were found to be very large and light, and contained large caverns within them. This could be due to the excess air pockets in the meringue. The fluffiness of the meringue did not support a sturdy quenelle.

The ones made with brown sugar looked similar enough to the other quenelles except for their distinctly darker color. Upon tasting, the difference was immediate. They also seemed a bit chewier; perhaps due to the extra water inherit of brown sugar.

The meringues that were whisked by hand did not make quenelles, but were delicious all the same. They baked into disks that had most if not all of their water boiled off. The ones with chocolate chips did not contain air pockets. This may be due to the wet, runny nature of the meringue used.

These quenelles were delicious and enjoyed along with our lemon curd and whipped cream.


References

Ref: McGee, H., Dorfman, P., & Greene, J. (2004). On Food and Cooking. New York, NY: Scribner.

Is A Rose By Any Other Gene… still a “Flour”

We began this week by visiting the Cornell Agricultural Station. Why was this an important stop for a class such as ours? Well, if you, our astute and clever readers, have been keeping up with previous blog posts, you will have noticed that we discussed GMOs and specifically, a GMO papaya that saved Hawaiian papaya crops (at least, as much as a protested- and litigated-against GMO can save a crop). Well, that papaya was developed at the Cornell Agricultural Station.

At the Ag. Station, specifically Barton Laboratory, they study two fields: Entomology and plant pathogens. We focused on plant pathogens during our tour. For those that may not know, plant pathogens are plant diseases caused by fungi, bacteria, and viruses, and this is an important area of study because diseases can have significant impacts on economies, such as with the papaya in Hawaii. There are many different environmental stressors that can increase a plants likelihood of infection, from climate change to cultural impacts, as well as extreme weather events. Studies are looking into understanding how these all effect plants.

It’s important to note that infections not only kill plants, they can give fruits produced off colors and flavors. Therefore, in order to maintain a fruit’s position in the market, these issues need to be remedied. Solutions for infection do exist, but some pose their own problems. Take, for instance, antibiotics. Antibiotics are one of the best ways to combat bacterial infections, but overuse leads to bacterial resistances, which make it harder to combat the infections. Barton Laboratory seeks to help with this. They recommend other solutions, based on their knowledge of the biology of the plants, to prevent against infections. These other solutions may take the form of what to do to prevent infections or strategic application of antibiotics, so that they are only used when absolutely necessary.

Given that plants don’t need to rely on humans to survive in the wild, how do they combat infections naturally? Well, much like humans have an immune system composed of antibodies developed through exposure to diseases, plants have an immune system composed of toxins developed through co-evolution with diseases. The differences are that humans’ immunities are based on proteins, while plants’ are based on nucleic acids, attacking diseases on the DNA level. This form of thinking is what gave rise to the first GMOs, as a form of vaccine for plants. Install resistances into their DNA, so that they can combat infections.

Yes, yes. The [in]famous GMO. The thought brings to mind images of mad scientists and syringes. But it is important to note that GMOs exist in nature (prime example is a sweet potato). As previous blog posts have discussed, GMOs have many benefits, so I don’t think that we need to get into them here.

20170309_130054_resized.jpg

Figure 1: Two papaya trees, both sprayed with the same infectious disease. Can you guess which one is the GMO and which one isn’t?

Bread. What a simple food, usually associated with the most basic of meals. However, it’s no mystery why one of the largest bread manufacturers in the US is Wonder Bread; bread is a wonderful thing! An amalgam of flour, sugar, salt, water, yeast, and love, bread is a staple food in our species. I grew up in a house that loved freshly baked bread. My father was a baker for many years, and we would often have our own loaves baking at home. To me, this is one of the most wholesome foods to create, especially with other people.

Our bread began as 6 different versions of dough (Figure 2), with varying kinds of flour (whole wheat, all purpose, bread) and ratios between these three. The doughs were allowed to rise for several hours in the fridge. After coming out, the dough was stringy. This stringiness was caused by the gluten strands having bonded to each other (Figure 3).

20170309_133103.jpg

Figure 2: Our 6 versions of dough.

20170309_133548

Figure 3: Look at them gluten strands.

After kneading the dough in order to stretch out the gluten strands and line them up even further, we added extra water and allowed the dough to rise before putting it into the oven. When it came out of the oven, our six loaves all had distinctive differences. The whole wheat doughs came out darker than the others, of course, but they also had a grainier texture and smaller air pockets. In the end, all of the bread was good, but I preferred the all-purpose bread, perhaps because that was what I was used to.

IMG_10521

Figure 4: We really dug into our bread!

20170309_161525.jpg

Figure 5: Sauce Mornay.

Along with our bread, we also made some sauces and a jam. These were pretty straightforward. The sauce, a Mornay, began as a roux, wherein we added flour to butter in order to make a paste, that would then have milk and cheese added to it in order to thicken it up (Figure 5). The jam was raspberry, and was an excellent example of how pectin can create a dispersion that can spread easily onto our freshly made bread (Figures 6, 7, and 8). Of course, the sweetness of the jam ensured that everyone enjoyed the outcome regardless of how successful the preparation was.

20170309_141250.jpg

Figure 6: First you cook the fruit down.


20170309_144951.jpg

Figure 7: Then you add the sugar and binding agent (pectin ).

20170309_150855

Figure 8: And then you can serve it or can it!

Ice Cream on a Farm

This week the Bonding With Food Class traveled out of the kitchen to get a closer look at life on the farm in Waterloo, NY.


Paul and Steve Galens are brothers who have worked hard to maintain a dairy farm for the past 20 years. Farming has been in their family for many years and over time, as organic became a popular food-trend, Paul and Steve transitioned to organic farming methods. I had never been given a tour of a farm before, let alone a dairy farm, and it was fascinating to observe what exactly takes place for us to be able to buy our milk at the grocery store.

The day we went happened to be the day that a milk truck was coming to pick up all of the milk that had been produced by the cows for the week. The image below shows the tank that contains the milk. Before collection, a sample is taken to ensure that the milk is truly organic (no antibiotics, chemicals, etc.). The milk is then suctioned through a tube into a large tank inside the truck. The man who does the milk collection makes about 15 trips a day to different dairy farms!

IMG_0363

Where do the dairy farmers get their cows? Well, interestingly enough they have a cow catalog that provides fitness information (and the name) of each of the cows for sale. Looking through the catalog was quite fascinating and who knew there existed a shopping catalog for farmers to pick their cows!

I might speak for everyone and say the best part of the trip to the dairy farm was getting to meet all of the beautiful female cows that provide Steve and Paul their milk. They were surely just as excited and curious about us as we were about them.

IMG_0369


After visiting the dairy farm we stopped by a homestead a few minutes down the road owned by Chris Santy and his family. He maintains his own farm in his backyard that he uses to provide for his family and share with his neighbors. I was fascinated by Chris’s dedication to his farm and his appreciation for his land, the plants and the animals that inhabit it. Chris has a commitment to sustainability and simplicity. His family does their best to reduce the amount of waste they produce. Any of their waste goes into a large compost pile that they then use for fertilizer the following year. As you can see below, he has even collected the bones of dead deer that he predicts will be almost entirely degraded in the compost pile by next year.

IMG_0378

Most fascinating to me was finding out that Chris used to be a pilot and decided to take up farming instead. It is clearly something he enjoys. He has his own farm animals that help provide the family with food and displays a great respect and awareness for his environment. I think that everyone can learn something from Chris about how to make the most of the natural world around us; you grow to have an appreciation for food and sustenance by growing it yourself that you don’t get just by traveling to the grocery store.


After a tour around the farm the class (and Chris!) experimented with liquid nitrogen to make ice cream. There are a few benefits to using liquid nitrogen for ice cream. For one, it makes ice cream especially smooth. We started with an ice cream base that was left overnight in the refrigerator. The base consisted of milk, vanilla, cream, sugar, and cocoa powder for chocolate. The base was then put in a bowl and mixed while liquid nitrogen was added in slowly. Liquid nitrogen is -321 °F allowing for rapid freeze of the ice cream. The secret to the creamy texture is this rapid freeze that prevents the formation of large ice crystals. Another reason to make ice cream with liquid nitrogen is because it’s fun to watch. The images below show what the process of making liquid nitrogen ice cream looks like! If you ever get your hands on liquid nitrogen you could have a blast making some of your own ice cream at home!


We even topped off the ice cream with some of Chris’s delicious home-tapped syrup and strawberries!


As the Cookie Crumbles

Ahh, the smell of freshly baked chocolate chip cookies, the smell of my childhood, and my favorite smell to date. What could possibly be better than the smell of chocolate chip cookies? The taste of course! The melting chocolate, gooey center and crisp crunch of a chocolate cookie is second to none but what makes a chocolate chip cookie so tasty anyway?

The purpose of the cookie is to be a sweet treat at the end of the meal. Like many other desserts, chocolate chip cookies rely on flour to create base layer. Different ratios of flour to water will produce vastly different styles of cookies. A high ratio of water to flour often dilutes gluten proteins and produces either a soft texture or a crispy texture depending on how much moisture is lost when baking. Flour also determines if the cookie will hold its shape after baking. In order for a cookie to hold its shape, it needs a high flour content to stabilize the cookie structure.

Like flour, sugar is a key component in the baking of cookies. When sugar is whisked with the fat, the sugar produces air bubbles that lighten the texture of the cookie and give the cookie a fluffy texture with every bite. Sugar also competes with the flour for the minimal amount of water present in the cookies. As the temperature rises during the baking process, more sugar dissolves and the outside of the dough begins to dry out, spread, and harden to give the cookies a distinct crunch. Along with structure, sugar also contributes to the flavor found in cookies. When heated to 50°C (100°F), the Maillard reaction commences and at 165°C (330°F) the sugar caramelizes and provides additional browning. The Maillard reaction breaks down carbohydrate molecules to produce molecules that create nutty and coffee flavors. Additionally, carmelization will further break down sucrose molecules to produce molecules that give the cookies a toasty or savory aroma.

The fat found in butter helps provide texture and flavor to the cookie. In fact, butter and eggs are often the only source of liquid for a cookie. When the butter melts, the liquefied butterfat causes the cookie to spread out and flatten in the oven. As the temperature continues to increase, the water partially gelates the starch molecules and further causes the cookies to expand.

When salt is added to the dough, it strengthens the proteins in the dough and makes the cookies chewier. It also enhances our body’s ability to sense sweet flavors and improves the overall taste of the cookie.

One final key component of a cookie is baking soda. Baking soda reacts with the acidic molasses in the brown sugar to produce CO2 gas, which causes the dough to rise. The carbon dioxide tenderizes the cookies and gives them an airy and fluffy texture. When moistened and heated, baking soda can be used to neutralize acid ingredients found in the dough, such as molasses, vanilla extract and butter. The neutralization of acids encourages the Maillard reaction to take place, thus adding additional flavors to the cookie.

The Nestle® Toll House recipe undoubtedly produces excellent chocolate chip cookies but we wanted to see what would happen if we varied the recipe slightly. We made cookies with 12 different variations on the Nestle® Toll House recipe that I have recorded in the table below. The recipe we used was the following and ingredients were combined according to the Nestle® Toll House recipe.

  1. 3 tablespoons sugar
  2. 3 tablespoons brown sugar
  3. ¼ cup butter
  4. ½ egg
  5. dash of vanilla
  6. ½ cup + 1 tablespoon flour
  7. ¼ teaspoon salt
  8. ¼ teaspoon baking soda
Modifications made to cookie Taste of cookie Code
No change to recipe Caramel notes, buttery, intense chocolate bites, soft 1
1/2 cup and 1 tablespoon gluten free flour to replace all purpose flour Less caramel flavor, lack of wheaty taste, intense chocolate bites, soft 2
1/2 cup and 1 tablespoon potato starch to replace all purpose flour Bitter, lack of caramel notes, less chocolate flavor, crisp 3
1/2 cup butter to replace 1/4 cup of butter Extra buttery, extra caramel notes, intense chocolate bites, crisp 4
1/2 cup and 1 tablespoon whole wheat flour to replace all purpose flour Distinct taste of whole wheat, buttery, intense chocolate bites, soft 5
6 tablespoons of brown sugar, no table sugar Extra caramel notes, distinct molasses taste, intense chocolate bites, soft 6
1/4 cup melted butter to replace softened butter Caramel notes, buttery, intense chocolate bites, crumbled easily, crisp 7
1/4 cup of olive oil to replace butter Distinct olive oil notes, intense chocolate bites, caramel notes, soft, 8
1/4 cup applesauce to replace 1/2 egg Hint of cinnamon flavor, intense chocolate bites, less caramel, soft 9
1/4 egg and 1 tablespoon vinegar to replace egg Slightly acidic, slightly less caramel, intense chocolate bites, soft 10
1/2 cup and 1 tablespoon bread flour to replace all purpose flour Caramel notes, buttery, intense chocolate bites, soft 11
1/4 teaspoon baking powder to replace baking soda Caramel notes, buttery, intense chocolate bites, crisp 12

We also looked for differences in color, shape, and consistency of the cookies.

Cookies

Here we see our first batch of cookies! Mmm, just looking back on this picture makes me hungry. From top to bottom we have cookies 5, 2, and 1. Cookies 1 and 5 look remarkably similar. Of course, 1 appears to be a darker brown color, likely due to additional bran, germ and endosperm that is found in the whole wheat flour. 2 appears to have spread out more than cookies 5 and 1. This is likely due to the fact that 2 was baked with gluten free flour. Without the massive gluten proteins and their strong intermolecular forces, the cookies can spread out more easily.

Cookies2

From top to bottom, we have groups 1, 7, and 12. All of the cookies in this batch appear to have the same shape. However, cookies in group 7 are much more cracked and crumble more easily.

Cookies3

From top to bottom we have 9, 11 and 6. Surprisingly, all of the cookies look remarkably similar. The only way to tell them apart is by looking at the pencil labeling on the parchment paper. They all have similar color and consistency but 9 does appear to have additional depth. However, it is distinctly possible that the cookies in group 9 had a greater amount of batter before being placed into the oven. Although they all look similar, they tasted very different (see table above).Cookies4

From top to bottom we have 9, 8, and 4. Well, the cookies in this set certainly look different! The cookies in group 9 and 4 appear to have much more browning, likely due to the fact that they were baked with butter and 8 was baked with olive oil. Unlike butter, olive oil does not contain carbohydrates. Consequently, olive oil will not undergo the Maillard reaction. Cookies in groups 8 and 9 have much more depth than the cookies in-group 4 because they didn’t have nearly as much liquid in their batters. The flatness of the cookies in group 4 gave them a the best crunch and they were my personal favorite.

Cookies5

Now for our final set of cookies and the wildcards of the bunch. From top to bottom we have 10 and 3. Our cookies in group 10 did not appear to undergo much Maillard reaction. This is likely due to the acid in the vinegar greatly reducing the amount of Maillard reaction taking place. Perhaps with more baking soda we could have had a greater amount of Maillard reaction take place. As for cookies in group 10, they were probably the least tasty cookies out of any group. Potato starch dissolves at lower temperatures than gluten proteins, which prevented the cookies baked with potato starch from gelating. This caused the cookies to become very thin and crispy (see picture below to see what happened during the baking process). Since the batter spread so thin, it burnt on the edges and had a bitter flavor.Cookies7

It was a wonderful and tasty day baking cookies. If you have ever experimented with your favorite cookie recipe, let us know. We would love to see what modifications you made and the changes that happened during the baking process. Happy baking!

Gastronomy: Arts, Science, a new way of living?

Cooking is an art. A perfect macaroon requires a batter with the perfect proportion of ingredients. Whisking too vigorously or adding too little sugar leads to the failure of the macaroon.

Cooking is science. Radiation in the oven accelerates the movement of water molecules. With the high temperature, the water molecules on the surface leave quickly while the water molecules inside the macaroon evaporate slowly, resulting in a Macaroon with a crispy surface but soft filling.

Cooking is a way of living. Food is the primary source of gaining energy and keep us alive.

As technologies have developed sharply and as we have accumulated increasing amounts of experience in cooking, our methods of cooking have transformed. The purpose of processing food is not just making sure that food is edible or tasty anymore. People have started to focus on a variety of aspects of food. It has to have the perfect ingredients, perfect texture, perfect color, perfect flavors and perfect aromas. In other words, everything has to be perfect and balanced, even if it is just a simple dessert.

With help from researchers, more and more unknowns about food and cooking are being discovered. Gastronomy is the study of the relationship between food and culture; the art of preparing and serving rich or delicate and appetizing food; and the science of good eating. It is also a new money maker. Restaurants advertise their foods that use Molecular Gastronomy and profit from it. However, you don’t need to be a scientist or an advanced professional cook to make Gastronomy food! You don’t need fancy or professional equipment either. As long as you have a spoon, a syringe, a cup, and some ingredients, which you can easily buy online, you can practice molecular gastronomy too! The chemistry behind it is easy to understand too!

Colin McDonald/CNET

For example, when sodium alginate reacts with calcium chloride, calcium alginate is produced and precipitates. Alginate is a polysaccharide that only thickens liquid with the presence of ions like calcium. Alginates cross-link with each other in the presence of calcium to form a network, the sphere wall. So, why is sodium alginate is soluble while calcium alginate is not? It turns out that calcium has an oxidation state of +2, while sodium has an oxidation state of +1. Compared with Na+, calcium needs to form an extra bond, which spans two alginates. The sphere is thus formed. Sodium and chloride are the spectator ions in this chemical reaction.

Picture2Picture3Picture4

With the displacement reaction, we can make caviar from chemicals. This technique now doesn’t only stay in the kitchen and on the food table anymore. People also utilize it in the “water bottle” industry. The popular edible water ball online is actually using this technique. The edible surface of the water ball is made from alginate too. See, science can be close to us and can be easy to understand. Sometimes the science behind the cool stuff we have watched online is not complicated. And Gastronomy, the study of the relationship of food and culture, is a subject that bring us closer to food, and does not create distance between food and us, as industrialization sometimes does.  It gives us a new way of living and a new style of living.

One of the other prospects of Gastronomy is re-discovering the taste of food and how our olfactory system works.  Molecules like those found in miracle berries can make us temporarily lose the ability to taste the sourness of the food.

After taking one tablet of the miracle berry, we tried the foods shown in the picture, including the lemons which normally give us an unbearable sour taste. Surprisingly, it turns out that this is the tastiest lemonade I’ve ever tried.  The lemons don’t have the extreme sour taste anymore. Instead, it gave me a rich sweetness with a little bit of competing sour taste. However, the used-to-be-tasty pickle was not so much anymore. The desirable sourness was gone, leaving all the old competing flavors as the main flavors we can taste now. There are other compounds that can affect our olfactory system differently, like making us not tasting the sweetness (as in gymnema sylvestre).

Overall, Gastronomy gives us a new perspective to use in looking at food and the science behind it. It is not simply a science or an art; it is a combination of science and art. It gives us the chance to use science to develop more art and a new way of eating.

Reference:

1) McGee, Harold. On Food and Cooking: The Science and Lore of the Kitchen. New York: Scribner, 2004. Print.

2)Oxford Dictionary

3) “Cross Linking Polymers” RSC Advancing the Chemistry. Web. 30 Apr, 2017. http://www.rsc.org/Education/Teachers/Resources/Inspirational/resources/3.1.9.pdf

4)Peters, Adele. “The Edible Water Bottle is How You Will Drink In The Future.” FastCompany. Web. 1 May, 2017. https://www.fastcompany.com/40403025/this-edible-water-bottle-is-how-youll-drink-in-the-future

4) Kowart, R. Kristen. Edible Water Bottle. The Spirited Science. Web. 30 Apr, 2017. http://thespiritscience.net/2014/04/26/edible-water-bottles/

5)McDonald,Colin. “spherification” Cnet. Web.30 Apr,2017. https://www.cnet.com/news/appliance-science-edible-water-bottles-and-the-strange-chemistry-of-spherification/ 


GMO with a Side of Mayo and Hollandaise Sauce, Please!

GMO vs GMNO

As soon as you hear “GMO” (Genetically Modified Organisms), what words pop into your mind? Unnatural? Sustainable? Evil? Or, even, nothing? GMO tends to be a source of confusion to the average person. In regards to safety, environmental issues, health benefits, and labeling, GMO have many facets to consider and often seem overwhelming. After reading arguments from both “for” and “against” GMO products, I cannot say that it gets any less confusing. Both sides of the spectrum present solid arguments, while also shedding light on unresolved questions as well. Therefore, to begin today’s class, there was no better way to highlight the complexity of GMO than with a heated, yet professional, debate.

Regardless of how each student felt towards GMO before entering the class, we were randomly selected to be “Team GMO” or “Team GMNO”. Here are some of the main arguments from each team:

Team GMO Team GMNO
·         It holds environmental benefits through association of conservation of tillage, preventing soil erosion, and reducing the need or irrigation (Lusk, 104)

·         Could prevent foods from becoming obsolete. For example, GMO saved the Papaya Industry in 1995 in Hawaii by altering the papaya’s DNA to create immunization from the Ringspot Virus that was destroying all papaya crops (Saletan)

·         There is no scientific proof that GMO causes health problems or diseases within the last 30 years

·         Cheaper than “Organic” foods (Lusk, 105)

·         Can provide supplanted nutritional value in foods that would not originally hold them, such as “Golden Rice” (Rice genetically modified to have beta-carotene, or Vitamin A) that was designed to feed malnourished people in Southeast Asia (Saletan)

·         If Anti-GMO protestors ever experienced hunger themselves, they would be outraged that people are denying them access to cheap foods that offer nutritional value. Question of privilege (Lusk, 113)

·         Why should the unknown nature of GMO frighten us so much that we end up doing nothing? We should develop it now for a time of crisis in the future.

·         It is an environmental hazard by producing herbicide-resistant GM products, in response to glyphosate resistant weeds, that would add highly toxic chemicals into the air and ourselves (Ji)

·         Although no scientific data yet, it may cause health problems and diseases in the long run as people age. “What is safe now may not always be in the future.”

·         Present-day science is unable to fully comprehend GMO – Potentially dangerous

·         Fruits and vegetables might become so altered by GMO that it will not be recognizable anymore – Possibility of no more nutritional value

·         When will GMO stop? Will it become a necessity for not only plants, but also the animals we eat as well? What will there be left to do if all our GMO products become irreversible

·         Issue of “consumer choice” and “human rights” where both farmers and consumers have no agency in controlling the food through “multinational corporations and governments” (Ji)

The nature of this debate was to not convince us that either side is “right” or “wrong” in how to approach GMO products. Instead, it gave us the opportunity to reflect whether our initial concepts of GMO flipped, remained the same, or falls somewhere in the middle. All in all, “GMO” remains a convoluted debate with no concrete answer. However, there was one argument presented today that stood out from the rest. It was given by our guest this week, Bruce Reisch, who is a grapevine breeder and geneticist at Cornell University’s New York State Agricultural Experiment Station. He explained to us that our food has been modified by humans for centuries. As humans, we have combined or mated plants that would have never naturally occurred. For example, grapevines from Asia and grapevines from North America. The Asian grapevines are more resistant to viruses than North American ones, and they were purposefully combined for taste and disease resistance. This has occurred in apples, grapes, broccoli, and other plants for years. A similar argument can be said about corn. Corn has become entirely dependent on human intervention and cannot grow on its own in such a vast quantity or quality as it is currently. This has occurred without any involvement of Genetically Modified Engineering, and can also never be reversed. In the end, foods have been modified to feed our planet with or without GMOs It lends yourself to ask the question, should these ‘natural’ methods of food production be as criticized just as much as GMO are?


MAYONNAISE AND HOLLANDAISE SAUCE

To mix things up a bit (pun intended), the next item on our list today was to talk about emulsions! If you are asking yourself what on earth are emulsions, just think of the salad dressing you put on your salad the other day. In the simplest terms – Emulsions are a mixture of two liquids that would normally not occur, such as oils and water. What allows one liquid to become dispersed in the continuous phase of another (such as oil-in-water or water-in-oil) are emulsifying agents. One of the most readily available emulsifying agents are egg yolks, which carry a special molecule called lecithin. Lecithin has one end that is soluble in oil (hydrophobic) and one end that is soluble in water (hydrophilic), making it a liaison between insoluble liquids that would normally try to separate from one another (McGee, 628).

Now, besides salad dressings, where can we find emulsions? As soon as you walk into the “Sauce” aisle of a grocery store! Today we focused on the two popular emulsions of mayonnaise and hollandaise sauce. You wouldn’t normally think of these two sauces as a remarkable chemistry experiment, but don’t be fooled. Making emulsions is not an easy task. Why? Because of precisely what we are doing –combining two liquids that don’t normally want to be combined. Through the creation of mayonnaise and hollandaise sauce, we witnessed firsthand the challenges to creating a successful, and delicious, emulsion.

Hellman’s Real Mayonnaise

First up, mayonnaise. This creamy, smooth sauce has become a normal household object in America as a topping for all sandwich options. When I think of Mayo, I think of Hellmann’s Real Mayonnaise, with the iconic yellow and blue label with navy blue cap (Some of you out west would recognize it as Best Foods – same stuff). However, today’s class taught me that it is so much more than that. Have you ever tried homemade mayo? Well, here is the recipe how:

Apparatus: ·         Stand mixer (whisk attachment), Cuisinart, or hand whisk

·         Mixing bowl (for hand whisking)

Ingredients: ·         ½ egg yolk*

·         ¼ whole egg*
*For hand whisked, just use one whole yolk, rather than the yolk/egg combination

·         ½ tsp salt

·         ½ tsp dry mustard powder

·         ¼ tsp ground pepper

·         1/8 tsp sugar

·         2 tsp citrus juice (lemon or lime)

·         2 tsp water or vinegar (flavored, if you like)

·         ½ cup oil (or more as needed)

Potential Variables : ·         Garlic cloves

·         Rosemary

·         Sesame

·         Schmaltz– Rendered chicken fat

·         Extra virgin olive oil (to replace any water/vinegar/citrus juice)

Instructions: 1.       Place all the ingredients except for the oil into the mixing vessel. Begin mixing.

*For the hand-whisked version in a glass bowl, begin with ½ of the aqueous ingredients (citrus, vinegar)

2.       Drizzle in the oil, drop by drop at first, mixing vigorously

3.       Continue mixing vigorously while adding in the rest of the oil increasingly rapidly, eventually reaching a steady stream

*With the hand-whisked version, once it looks like completed mayonnaise, but only halfway through the addition of oil, add the remaining ½ aqueous material and finish whisking in the remainder of the oil

1. “Control” with balsamic vinegar. 2. Olive oil (with no vinegar) 3. Recovered mayonnaise from salad dressing 4. Red wine vinegar 5. Sesame additive and balsamic vinegar 6. Rosemary, garlic aioli and white wine vinegar 7. Schmaltz / garlic and white wine vinegar

 
We ended up creating six styles of mayonnaise utilizing different mixing techniques, assortments of vinegar, and additives. The crowd pleaser was the rosemary/garlic aioli mayonnaise. Who knew mayo could be so classy?

Slowly adding in oil drop-by-drop with whisking.

Adding in the oil drop-by-drop into the moving cuisinart.

The first important aspect of making mayonnaise is the act of mixing. As hinted above, emulsions do not occur spontaneously. They require energy to overcome surface tension, in the form of vigorous mixing. The second requirement is making sure that you don’t add the oil too quickly into the continuous phase (the water). Imagine dumping a large amount of oil into a bowl of water – no matter how many times you try breaking it up with your spoon, the oil droplets will always form a large mass with each other again. The same is said here. To avoid the oil from irreversibly forming a large mass, you add the oil drop-by-drop. This allows the oil molecules to individually interact with lecithin in the egg yolks to form a proper emulsion. As time progresses, the oil can be added in faster because the mayo is thicker and is thus contributes to breaking up the oil droplets.

The irreversible salad dressing – Take note in that it has the exact same ingredients as mayonnaise, just added together differently! 

The salad dressing transformed into mayonnaise with a little help of an egg yolk

So, how do you fix your mistake if you add too much oil at once? Another egg yolk! One of our groups purposefully disrupted the emulsion process by adding all the oil in at once, and they ended up creating salad dressing. No matter how long they would mix it, the salad dressing would never spontaneously turn into mayonnaise, even though that would be a cool trick. This is because with the introduction of so much oil at once, there is no way to spontaneously connect tiny, individual oil droplets to water molecules when they would rather just stick to themselves! We restored it by placing another egg yolk in a clean Cuisinart, mixing it up, and then slowly adding in the salad dressing drop-by-drop. It was mayonnaise again. Good as new!

Next up was the hollandaise sauce. This is an emulsion that involves egg yolk and liquid butter, and it goes great on eggs benedict. Here is how to make it:

Apparatus: ·         Tablespoon measure

·         Whisk

·         Small saucepan

Ingredients: ·         3 egg yolks

·         8 tbsp “fat”
Options: Butter, ghee, clarified butter, schmaltz, margarine, olive oil

·         3 tsbp “aqueous ingredients”

Options: 2:1 water/lemon juice, lemon juice, lime juice, vinegar of your choosing

·         Salt to taste

Instructions: 1.       Soften/melt the “fat”

2.       Whisk the egg yolks and the “aqueous ingredients” over low heat, stirring continuously

3.       After a minute or two, when the mixture is completely homogenous and frothy, begin adding the soft/melted fat a drop at a time, with vigorous whisking

4.       Continue adding the fat, increasing the speed of addition as time progresses

5.       Continue whisking over the heat once all the fat is added until the sauce holds appropriate consistency

6.       Remove from heat, add salt to taste, and serve

Adding in the butter drop-by-drop while vigorously mixing – You’re going to need two people for this!


The hollandaise sauce was also created with six different variations. We utilized four different kinds of “aqueous ingredients” and three kinds of “fat”. Out of all the different styles, the ghee hollandaise sauce stood out from the rest and it had to do with its moisture level. A disclosure about the “fat” options is that despite their logical association, they contain water in them. For example, butter is only about 80% fat, 15% water, and 5% other components, such as proteins and salt. This is what contributes to hollandaise’s creamy, liquid texture. Meanwhile, ghee is made up of entirely butterfat, where no water remains and the milk solids get strained out after they are browned. Due to the continuous phase in hollandaise sauce being water, the less water there is, the more the sauce will thicken. This lack of moisture is what contributed to its almost “clumpy” texture.

Hollandaise sauce with ghee

You know it’s a thick hollandaise sauce when you can turn it upside down!

If there is one thing that I learned from class today, it’s that store-bought mayonnaise and hollandaise sauce are nothing in comparison to their homemade counterparts. These are easy, tasty, and act as a little chemistry experiment! Next time you’re craving an emulsion, which I know we all do (even if we don’t know it), try out these two recipes. It doesn’t hurt that you’ll impress everyone around you, too.

References:

Ji, Sayer. “Think the Anti-GMO Movement Is Unscientific? Think Again.” Waking Times. 25 May 2015. Web. 12 Apr. 2017. http://www.wakingtimes.com/2015/05/25/think-the-anti-gmo-movement-is-unscientific-think-again/

Lusk, Jayson. The Food Police: A Well-Fed Manifesto About the Politics of Your Plate. Crown Forum, 2013. Web.

McGee, Harold. On Food and Cooking: The Science and Lore of the Kitchen. New York: Scribner, 2004. Print.

Saletan, William. “The Misleading War on GMOs: The Food Is Safe. The Rhetoric Is Dangerous.” Slate Magazine. 15 July 2015. Web. 12 Apr. 2017. http://www.slate.com/articles/health_and_science/science/2015/07/are_gmos_safe_yes_the_case_against_them_is_full_of_fraud_lies_and_errors.html


Someone’s got some eggsplaining to do!

If you think about it, the egg is actually quite marvelous. It’s so simple and so cool! This little oval shape houses the transformation of nutrients into a living, breathing thing! Our ancestors were fascinated by this and as time went on we obviously attempted to learn all we can about this odd mechanism of life.

We learned that the egg white provides both physical and chemical protection, as well as water and protein for development for the growing embryo. Egg white is called albumen. It is applied over the yolk in four layers that alternate in thick and thin consistencies. The first thick layer of albumen protein is twisted to form the chalazae. The chalazae consists of two dense, slightly elastic cords that anchor the yolk to the shell. They allow it to rotate while still remain suspended in the middle of the egg. This is a cushioning system for the embryo. The yolk makes up just over a third of the egg’s weight. It contains fats, proteins, vitamins, and minerals. The yolk’s yellow color comes from plant pigments called xanthophyll the hen ingests  from feed. The yolk is made up of concentric spheres–like a Russian nesting doll! This is also where cholesterol is located… In fact, the egg is the richest source of cholesterol among our common foods.

Some may think this is bad considering too much cholesterol in our blood could contribute to heart disease by clogging up our arteries and thus blocking the passage of blood vessels to–or from–our heart. Our livers produce all the cholesterol we will need, so it is no surprise that for years medical associations have been urging us to limit our intake of egg yolks. However, recent studies suggest that dietary cholesterol (cholesterol ingested from food) has a relatively small effect in raising blood cholesterol levels. In fact, blood cholesterol is more heavily influenced by saturated fats than cholesterol itself. Furthermore, the total body levels are heavily influenced by genetics, gender and age. So eat that egg with no fear!

The reason we looked into the inner-workings of the egg is because we, as a human race, like to try and put anything in our bodies that could potentially be of use to us, no matter how absurd it may seem.

Naturally, we industrialized the chicken and of course, as we had hoped, benefits ensued. We slowly developed an efficient way to optimize the amount of eggs a hen produces on a given feed diet. We have also improved egg quality, an even better plus!

The invention of the refrigerator was a huge life-saver (literally). With refrigeration, egg quality deteriorates to a significantly lesser extent. Salmonella bacteria also multiply to a much slower when cold. This bacteria does seem to be a major drawback to the industrialization of the egg. With mass production, comes mass contamination.

Hens that no longer lay eggs are often recycled into feed for the next generation of egg-layers, and this tends to spread the infection of salmonella. Now salmonella is a major fear for consumers. There was an outbreak in 1985 in Europe, Scandinavia, Great Britain, and North America. In the 1990s, it was estimated by U.S. health services the one out of 10,000 eggs contained active salmonella. Today, that number has been reduced to one in 20,000.

Although the risk is half of what it used to be over 2o years ago, the risk of salmonella infection still stands. This causes much distress in consumers, who then lash out at producers for providing potentially harmful food to their communities, and then a whole uproar begins on every link in the egg production network.

Producers began refrigerating eggs as they were being transported to reduce the salmonella growth. However, this was still not enough to gain the trust of consumers, so a warning label was put on the egg cartons along with proper directions for cooking and storage. Now the responsibility is on the consumers.

We began class with a video chat with Becky Goldberg, a lawyer who works for the FDA. She was able to give the point of view of the government and where it stands and where it dabbles in the salmonella issue. Often times, as consumers, we can only see things from our perspective and next to nothing about what farmers have to go through to get the product to producers to be processed and then transported to stores. We really don’t know how complicated the whole system is.

As a class, we couldn’t see why salmonella risk could end with the farmers. Why can’t they keep the hens from carrying salmonella? Salmonella comes into hen houses on rodents. So if farmers kept the hen houses clean, the problem would be solved. Nope. That is nearly impossible task to do.

Ok, so why can’t farmers test hens for salmonella? Do you know how labor intensive that is? What about antibiotics? But now we are getting into the conventional versus organic issue that consumers also have.

The issue is, farmers have exhausted all the possible solutions. So now we ask the dreaded question: should there be a level of government involvement? This costs money, however it is the government’s job to take care of its citizens.

In 2009, the FDA imposed a law on the requirements on egg farms. This law stated that there would be testing at certain time periods. First, the environment is tested for salmonella. If this comes back positive, then the eggs must be tested. This involves taking a sample of 1,000 eggs to see if salmonella is active in them. This is also a very labor-intensive task, not to mention quite expensive.

Many people get mad about the government for not stepping in sooner to solve a problem, but many people also don’t understand the mechanics of how the government runs. When the government does decide to get involved, people still are not satisfied because the process seems to take forever. Well, this is because the government has a protocol to follow as well and a good portion of it involves consumers’ opinions.

After many years working through this tedious protocol, the FDA enforced a law that egg farms with 3,000 or more hens had to follow specific criteria to minimize the risk of salmonella contamination.

When attempting to take food-related issues to court, there is never just one side to the story, and there is never a perfect solution. As consumers, we need to be patient and trust that our government does its job at governing our food politics.

After our very informative and eye-opening video chat with Ms. Goldberg, we decided to dive into the science of eggs. Finally!

We conducted an experiment, or should I say eggsperiment, involving eggs cooked in a sous-vide, ranging from 57.2 degrees Celsius to 82 degrees Celsius. These ranges were equally proportioned out and we looked at the structure of an egg cooked to each temperature. We even got to eat them too!

The first temperature the eggs were cooked at was 57.2 degrees Celsius. These were quite the opposite from the hard-boiled eggs we were all expecting. The egg whites were not white at all, but quite clear. There was a yellow tint in them most likely from the yolk. The two distinct layers of whites were extremely noticeable, and the yolk was intact.

img_3530

To be honest, I don’t think anyone was brave enough to eat this one.

The second temperature was 62 degrees Celsius. These eggs were a bit more intact than the first batch. The yolk was covered in a layer of egg whites, and the rest sort of just fell out of the shell onto the plate, clumped into a pool of water.


img_3531

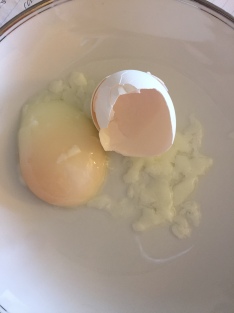
Doesn’t that look delicious?!

The third temperature was 65 degrees Celsius. These eggs looked pretty similar to those cooked at 62 degrees, not surprising given the three degree difference. Now we can start to see how the proteins in the eggs are denatured due to the high temperatures endured in the sous-veed. Once denatured, the proteins start to coagulate and form a solid-like structure.

img_3534

Notice how it is slightly less watery and appears to have a firmer structure.

The fourth temperature was 68 degrees Celsius. Here the eggs looked almost hard-boiled. Because of this misinterpretation, I thought the eggs would feel hard-boiled when eaten as well. They did not. Soft-boiled eggs are an acquired taste (or probably texture) that I do not have. What was really cool about this temperature was that we discovered the yolk could be molded and shaped. This is because more proteins are coagulating, thus a stronger structure is forming.

At 72 degrees Celsius molding the yolk was even easier. We opened it and were exposed to its rough, grainy texture. Naturally, we had to chew it! It was a weird sensation. This was the temperature we were first introduced to the smelliness of eggs. Now the hydrogen sulfide was in the egg whites, informing the class of its presence.

At 74 degrees Celsius we finally started to get somewhere. Now the yolk was much firmer, and not nearly as moldable. This time it was susceptible to cracking. Professor Miller found this yolk to be particularly entertaining and found it to be weirdly chewy. In the mouth it spreads apart under the pressure of the teeth, but once the jaw opens back up, the yolk reformed into its original shape! In a way it was acting like gum. But with vigorous chewing, the yolk was eaten.

img_3543

See how it is much more dry than the one before?

We experienced some difficulty getting the shell off of the 78 degree Celsius egg, similar to how the shells are difficult to remove on hard-boiled eggs…

IMG_3549.JPG

THE FIRST ONE TO NOT SCARE ANYONE AWAY

82 degrees Celsius was our last temperature for this experiment. Similar to at 78 degrees, the shell was also difficult to get off and much of the egg white stuck to the shell upon removal.

IMG_3559.JPG

A drastic difference in appearance can be seen across the temperatures, clearly depicting the progression of protein coagulation due to cooking. When heated, all the molecules in the egg move faster and faster, collide with each other harder and harder, and eventually begin to break the bonds that hold the long protein chains in their compact, folded shape. The proteins unfold, tangle with each other, and bond to each other creating a three-dimensional network. These protein clusters, divide up the water in the egg, blocking it from flowing, thus the egg becomes a moist solid. Also, since the large protein molecules have clustered together so densely, they can reflect light rays and the once transparent “white” of the egg, becomes opaque (white).

IMG_3560.JPG

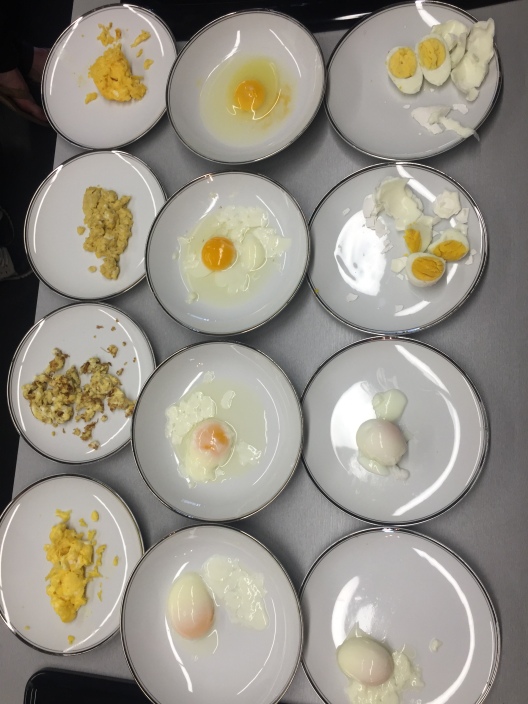
Which one is your favorite?

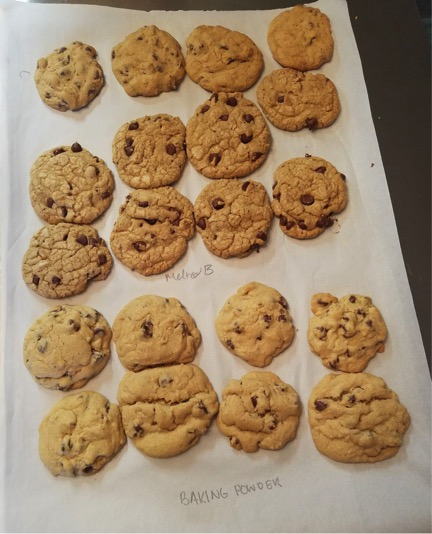
On the left is a side experiment we did. We attempted to make scrambled eggs at various temperatures and times. The lower-left eggs–the ones that look the most appetizing–were cooked on medium heat for 1 minute and 45 seconds. The next were cooked on high heat for 45 seconds, and the top were cooked on low heat for what we wanted to be 2 minutes and 45 seconds, but what actually turned out to be 5 minutes and 30 seconds because they were nowhere near done. Clearly this experiment has some gaps between the big time jumps as well as the temperature jumps. It would be interesting to see a more concise and continuous level of change through the variables here.

Another side experiment that was fun was grilling an egg. Don’t worry I haven’t heard of that either. We really wanted it to explode, and when we heard the cracking we all shielded ourselves for…nothing!

IMG_3541.JPG

Fresh off the grill! Check out the cool Maillard reaction on the shell.

I don’t think any of us could have predicted what was on the inside…

Look at that yolk! It’s half liquid-half solid!

Overall, today was a pretty cool day. And we learned a lot about the FDA’s role in food politics and narrowed down our taste in eggs. That’s all yolks!

Organic vs. Conventional: Is the Label Worth it?

To begin the discussion on the debate around organic versus conventional foods, it only seemed fitting to start the class by doing a blind taste test comparing various organic and conventional foods. We noted which of the two was organic and which tasted better. Interestingly, there was very little difference in appearance between the two foods, but a level of varying texture was noted. In comparing ingredients, many foods had slight differences. For instance, the chart below compares the Wegman’s Organic Semi-Sweet Chocolate Chips to the conventional version. The only two main differences between the two is the fact that conventional uses soy lecithin, because most soy is genetically modified, and organic uses sunflower lecithin. The question to ask would be, “Is the ‘organic’ label in front of each ingredient all that important?”

Wegman’s Organic Semi-Sweet Chocolate chips Organic Sugar, Organic Chocolate Liquor, Organic Coco Butter, Organic Sunflower Lecithin.
Wegman’s Semi-Sweet Chocolate Chips Semi-Sweet Chocolate (Sugar, Chocolate, Cocoa Butter, Soy Lecithin – an Emulsifier, Vanilla).

Though many of us were able to distinguish a difference between the organic and conventional foods, we had difficulty in determining which foods were organic and which ones were not. Much of our inability to distinguish the two results from the fact that we often have preconceived notions as to how organic foods will taste, as if organic somehow should taste “better,” because we expect that it should. Something labeled “organic” does not make it somehow healthy, such as the organic potato chips. A potato that has been deep-fried does not exactly make it better in comparison to the conventional potato that has been deep-fried. Getting caught up in labels can be easy to do once binaries of healthy/unhealthy have been paired with organic/conventional. I find that I can be guilty of this, because I expected it to be much less difficult to distinguish between the various foods once they were side-by-side, and expected a greater or richer taste in the organic foods.                                                                                                                                                                      fullsizeoutput_1862.jpeg
Our discussion then turned to our opinions regarding a particular section of Jayson Lusk’s The Food Police, in which he makes several claims against the notion that pesticides have harmful effects. These claims conflicted with Marion Nestle’s, in which she claims that the reason for the government regulation of pesticides is due to their harm. We came to consensus that both authors are correct to some degree, and it is true that the risk of pesticides is much less than consumers think.

Though organic and conventional foods may not have much nutritional difference, the techniques of organic and conventional farms do contrast to a more significant degree. For example, conventional farming has a very high degree of fossil fuel input and a higher degree of waste output that is not circulated back into the farming cycle. On the contrary, nonconventional farming uses various natural resources and uses its animals to cultivate richer soil and richer fertilizer without the use of chemicals. This creates a more fluid cycle between the animals and the environment so as each plays a role in the output. Understanding the difference in farming methods might lead one to opt for the organic produce or produce from a more nonconventional method, rather than simply because the organic is “better.


In a separate blind tasting experiment, eight different foods were pureed, and we had to determine the food based solely on taste, as each had very similar textures. I think that this experiment was the prime example of “looks can be deceiving,” because though the colors were vibrant and aesthetically pleasing, the taste was anything but that. The fruits pureed well and had a nice consistency, but the vegetables, such as the red pepper and carrot, had a very odd flavor. Oddly enough, the blueberry pureeing became more of a jam consistency, and gelled, unlike the others. I think this experiment allowed us to recognize that certain foods are better left intact, in their un-pureed form.

fullsizeoutput_1863.jpeg

In the kitchen, we experimented with various cooking techniques to determine how the vegetables would differ in taste. These included frying, microwaving, baking, steaming, sautéing, grilling, and cooking via sous vide. Though I was a bit skeptical of the frying method, many classmates enjoyed the crunchy broccoli and crisp beet leaves.

img_7735 img_7737 img_7738

The sous vide, on the other hand, did not provide as promising of taste as the other methods, and actually gave several vegetables a different, less than pleasing flavor profile. I was most surprised by the fact that the sous vide altered the taste the most, because in the previous week, the meat cooked via the sous vide method was the most delicious.

img_7741 fullsizeoutput_1864

The final experiment consisted of three samples of raspberry juice, three samples of blueberry juice, and three samples of cabbage juice. One of each sample was basic, acidic, and neutral to observe the color change. We then added vinegar to the cabbage that already had baking soda in it to produce a mini colorful volcano.Though it did not necessarily have much to do with the organic vs. conventional debate, it was still science, and there is always learning in science.

fullsizeoutput_1867.jpeg fullsizeoutput_1868.jpeg


There is not a clear-cut, black and white answer to the organic vs. conventional debate, and new studies may emerge that prove otherwise. In the meantime, keep eating fruit and vegetables, even if they don’t have a fancy “organic” label.

Got Milk?

The dairy industry today is one of the largest industries in the world.  The milk industry produces $21 billion a year.  Milk can then be transformed into a variety of different products that range from ice-cream to cottage cheese and everything in between.  Milk is also made up of mostly water.  However, there is also fat, proteins, lactose and other minerals floating around as well.  Both the readings and the class discussion touched upon the two proteins that make up milk, casein and whey.

Nowadays, many cows are constantly pumped with different antibiotics for various reasons.  The most common is rbST or recombinant bovine somatropin.  Some people see this as controversial, thus the FDA conducted a study and concluded that there is no difference in milk from rbST treated cows vs. non-treated cows.  Now, who am I to say which one is healthier or tastes better?  That is up for your interpretation!

It is important to note the two types of ways that the FDA ensures that the milk is safe for the public.  The first is pasteurization.  Simply put, it is heating the milk until all the dangerous alive stuff is now dead and not dangerous.  Adding a little bit more complexity entails the preservation of milk by killing pathogenic microbes by inactivating certain milk enzymes.  The second major way is through homogenization.  This is just the funneling of milk through smaller nozzles to break apart the fat globules that are in the milk.  This aides the process of keeping the milk the proper consistency.  Simply put, it makes sure the fat within the milk is evenly distributed.

Moreover, we talked about all the amino acids and the different intra-molecular forces that keep proteins from denaturing under normal circumstances.  The three main ones that we touched upon in class were; Hydrogen bonding, “pie-stacking”, and disulfide bonds.  Disulfide bonds are by far the strongest bonds.  They are commonly seen in bread.  Another fun fact about amino acids is that proline, which is categorized as a small amino acid, is very rigid due to its ring.  Thus, it cannot be involved in any alpha-helices and is most commonly found in gelatin.

img_0049
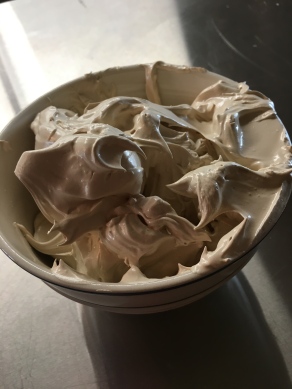
Now for the fun stuff!  The heating of milk! I know it doesn’t sound like the most excited thing but don’t worry well get there.  Heating milk is how someone makes cottage cheese.  Cheese curds!  The heating separates the whey protein and curds.  The picture on the left shows the result for this reaction.  Now obviously the first part of this is to pour milk into a pot and turn the heat on.  Simple, right?  Then you just wait ad drain at the end and you have cheese curds and whey! All my life I always thought that whey was a solid  A lot of protein supplements advertise “Pure Whey Protein” and when you get the protein its solid.  So, without asking questions I just assumed that it was solid.  Sadly, I was mistaken.  Don’t believe everything you see on the internet! Except for this blog! 100% facts.

Another misconception I had was that the only way to make butter was to churn it.  Again, sadly mistaken.  We made butter in a mason jar.  Yes, you read that correctly.  Agitating the butter in the mason jar allows the fat globules to coagulate and form a solid.  That solid is butter.  Emulsifiers hold the fat globules together.  They have a hydrophilic end and a hydrophobic end.  The hydrophilic ends are water soluble while the hydrophobic ends are fat soluble.  Using the same chemistry, we also made butter in a kitchen aid!  Now this was not as much as a workout as making butter with a major jar but ended up producing the same product.


img_0047

The last and final experiment that we did was heating butter!  The butter was introduced to the heat and was stirred continuously for about 10-15 minuets.  The butter turned from solid to liquid and then back to solid!  The water in the butter evaporated and we were left with the butterfat, milk solids and lactose. Now, when we continued to heat up the now butterfat, milk solids and lactose the sugar begins to turn color and brown.  Similar to the caramelization’s that we did last week that Jack told you all about.  Besides making butter in a mason jar, which really shook me up, I thought this was the coolest reaction of the day.  I especially liked how it brought us back to the last class because it doesn’t matter how food starts, once you break it back down to one of the basic 4 food groups, everything remains constant.  Finally, to end the day, the class got to enjoy a variety of different cheeses that all had something special about them.  By the way, did you know that cheddar cheese came from the town of Cheddar, England?  That’s our fun fact of the day.  Thanks for tuning in to our class blog and be sure to stop by again next week to learn more about meats!